Be yourself; Everyone else is already taken.
— Oscar Wilde.
This is the first post on my new blog. I’m just getting this new blog going, so stay tuned for more. Subscribe below to get notified when I post new updates.
Be yourself; Everyone else is already taken.
— Oscar Wilde.
This is the first post on my new blog. I’m just getting this new blog going, so stay tuned for more. Subscribe below to get notified when I post new updates.


Part 1: I made the sketches above to help me visualize what my final product might look like. I enjoyed unrolling objects, and so I decided to do something similar for lab 4, and so for my final project I decided to create what I made from lab 4. To do this I will need need paper, and a lot of tape. The tape will be used to not only fold the cubes, but also tape multiple cubes together.


Part 2: My model had already been created, and to see more pictures of that refer to my lab 4 post. But I did work more on my model for the final project. I knew it would be very difficult to tape the cubes together in the correct way because there are 24 cubes and its hard to visualize where they go. So I decided to deconstruct my model into layers. I made a base layer, a middle layer, and a top layer.


Part 3: I printed out and folded 24 cubes. It didn’t take as long as I thought because after the first few I got into a rhythm. However, making the cubes was not the hard part. Putting the cubes together to make the bigger model was incredibly difficult. The layers I had turned my model into came in very handy, and had I not done that I don’t think I would have been able to properly piece this thing together. Even though it was super difficult it was still super fun. It was like a 3D puzzle!
Reflection: Overall I really enjoyed the final project. Even though we were not able to use any laser cutters or 3D printers I still liked making something physical. I do think my model would look better 3D printed, but putting it together this way provided more insight into the modelling process. Rather than just having to think about whether a 3D printer could handle it, I had to think about whether I could handle it. More specifically I had to think about if what I was making could be taped together and if putting each cube in a specific spot would physically work. I definitely enjoyed this project and I definitely enjoyed this class. Thanks!


My idea for my final project is to make something abstract using the skills we learned from unrolling. We cant use any laser cutters or 3D printers, but I can still find printer paper and make unrolled objects. Cubes are simple to unroll and simple to make, so I decided to use cubes as a building block for a bigger model. When I make this object in real life I will make a bunch of paper cubes and glue them together. As the pictures show, I ended up stacking a bunch of cubes together to make an object that resembles salt crystals. In my eyes this object would act like a center piece, kind of like plants you might find on a table in a restaurant. As such the additional objects I decided to model for lab 4 were a table, a chair, and a stand to hold the object.

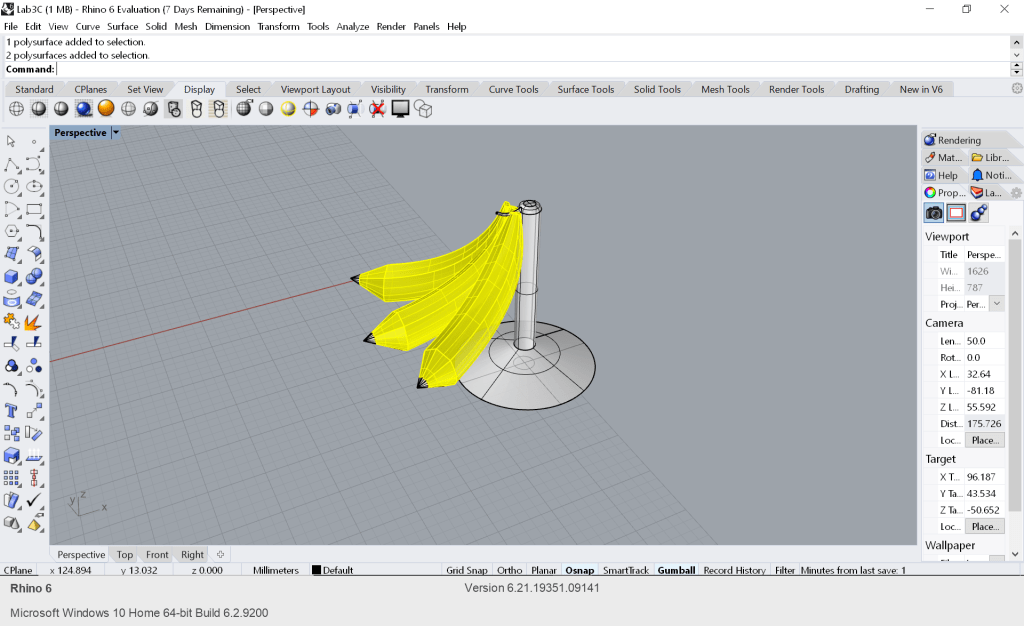

For this part of the lab I modeled a banana, a banana holder, and a sink. Modeling the banana was definitely the most difficult. It was deceptively hard to get the right shape and texture. I had to use the ExtrudeCrvAlongCrv command to get the initial shape of the banana, and then I had to use cage edit to further shape the banana.
The next object I modeled was the banana holder. This was much simpler to design, as the texture and shape is much less organic. The hook was a little tricky to get tapered correctly, but other than that the banana holder design went smoothly.
The last object I modeled was the sink. This object is supposed to work with the real life object I modeled in lab 2. In lab 2 I made a water bottle, and was having trouble thinking of what works with a water bottle, but I decided a sink would be good, to fill the water bottle. The sink design went mostly smooth too. The only trouble with it was the faucet. To make the faucet I made a long hook shape and then used the pipe command.


Part B of this lab was the most fun. I decided to make the octahedron from the file provided to us. It was really fun to print it out and fold it together. As you fold it you can really see the shape come to life. In one of our recitations we folded an unrolled object together, and in that lab our shape was a lot more complicated. We were not able to get the folds as precise as they needed to be and as such our shape came out looking very wrong. However with a simple octahedron the shape came out really great!


Part A of lab 3 was very interesting. I made three objects with the intent of unrolling them. I started out by making a snowman because I was interested to see what unrolling three spheres on top of each other would look like. To make it look more like a snowman I added some arms too. The next object I made was a bell, similar to some of the shapes we unrolled in class. The final object I made was inspired by the snowman, but instead of three spheres stacked on top of each other, I stacked 3 cubes on top of each other.
After modeling all the objects I unrolled them. Unrolling the snowman was super crazy. It starts off as a spiral but then it got all jumbled up and crazy looking. I think the arms of the snowman messed up the unrolling. Next I unrolled the bell, and it unrolled really nicely. Nothing overlapped and there was a very clear pattern. Lastly, I unrolled the cubes, I was very interested to see how it unrolled, and it looks completely different from the snowman. Its basically just a bunch of squares, which makes sense.


Lab 2 part D was my favorite part of lab 2. It felt really good to work with wood because it is so much sturdier than cardboard. But what I like the most about this part of the lab is holding and playing with the finished products. There’s something so satisfying about putting the joints together and hearing them click.
Making the joints was fun too. It was a bit challenging to think about, mainly because we had to think of a 3D object but model it in 2D. For that reason it was especially hard to model the 90 degree joint, and even though my 90 degree joint is quite simple it still took me some time to think about whether I was doing it correctly.

The original idea behind my object was to be a staircase. However once I finished modelling it other things started to jump out at me. In my eyes it went from a staircase to a chair, to a bench, to a shelf. But one recurring theme behind all these items is furniture. Whether a stair, chair, bench or shelf, my object feels at home when its next to other furniture. So the other items I modeled are a table and a standing lamp. The table was simple (just a couple of rectangles extruded and filleted), however the lamp was a bit difficult. The lamp consists of 3 parts, the base, the pole, and the shade. The difficulty was in making the base and the shade look natural and proportional.


Lab 2 part B was really fun. Thinking about what object to make wasn’t as simple as it sounds. Not only do you have to think of something interesting to model, but you also have to think of how it will slice. I decided on making a curved “stair” like object, for the reason that vertical slices might look really cool.
Once I finished modeling the item I played around with the different slicing options. Vertical slices did look cool, but once I saw radial slices I fell in love with it. It went from looking like an abstract staircase to a comb like thing.
Cutting out the object is a different story though. I think it would have turned out better had I used a stiffer material. The edges of the cardboard are too flimsy, and wedging the object together crumpled the cardboard. Even though the final product wasn’t as good as I had hoped, it was still fun and I enjoyed seeing the object go from the computer to my hands.

For my real life object I chose to model my water bottle. It is a simple model, essentially just a cylinder, however to make it look accurate I had to fillet the edges and add a loop. Filleting the edges was not a problem, however the loop had some difficulties. Extruding the loop in the correct direction took a few tries, and once I got that correct I had to find the right thickness. Overall it was a good exercise in using both surface and curve commands to make something cohesive.


Part C was my favorite part of Lab 1. It was fun to finally work with 3D objects, and the tools are surprisingly more intuitive than the surfaces. My favorite tool is the cage edit. When I first used cage edit I made a super crazy object. I pulled the points all the way to the sides of my screen and the object ended up looking like a huge explosion from a different dimension. I then deleted that object and made something that looks like a potato.
Have a WordPress.com account? Log in now.

